
If you are trying to send a Push Notification to your IOS6 iPhone/iPad Sencha Touch 2.2 Application may be you have found some issues. In this article we will see how to configure certificates, setup Sencha package.json and send notifications using PHP and C#.
Introduction
According to Sencha documentation – http://docs.sencha.com/touch/2.2.1/#!/api/Ext.device.Push – it’s possible to enable the App in the notification service with the following code
Ext.device.Push.register({
 type: Ext.device.Push.ALERT|Ext.device.Push.BADGE|Ext.device.Push.SOUND,
 success: function(token) {
 console.log('# Push notification registration successful:');
 console.log(' token: ' + token);
 },
 failure: function(error) {
 console.log('# Push notification registration unsuccessful:');
 console.log(' error: ' + error);
 },
 received: function(notifications) {
 console.log('# Push notification received:');
 console.log(' ' + JSON.stringify(notifications));
 }
});
It’s simple but dosen’t work so easily. You have to generate correct push certificates at developer.apple.com and configure correctly the sencha package.json.
Let’s do it step-by-step. I’m assuming that you are already familiar with IOS Native Push Notifications. Give a look at this http://www.raywenderlich.com/32960/apple-push-notification-services-in-ios-6-tutorial-part-1.
Using this tutorial on 30′ you are able to have a Native App with Push Notifications. Now let see the important steps for Sencha Touch 2.
Certificates
Go on developer.apple.com and click on Profiles
When you are in, select Identifiers -> App IDs -> <your app> (appname in the screen shot)
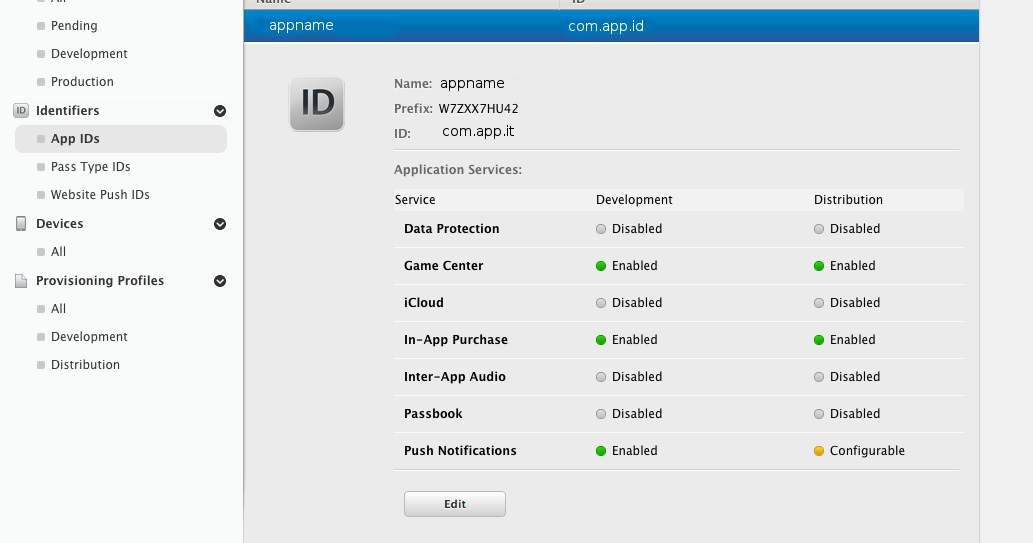
and press Edit
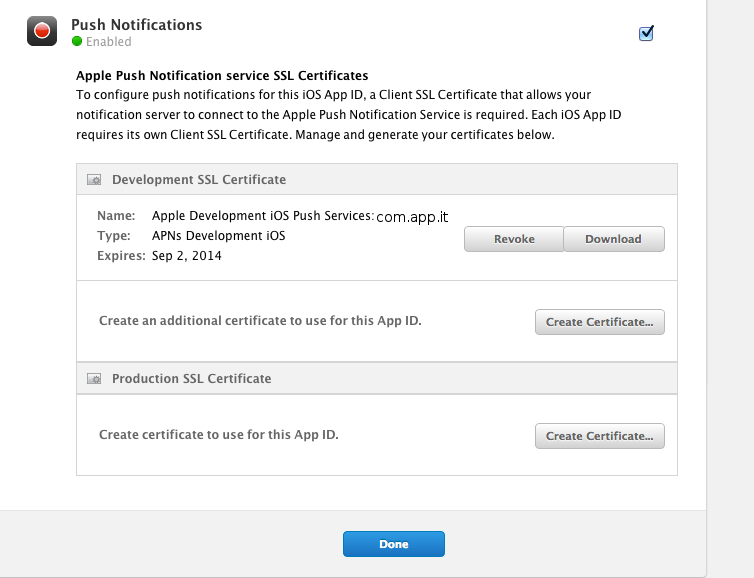
Create the certificate the first time and then download it. In this example the certificate downloaded is named aps_development.cer.
Once you have the certificate you need to transform it in .pem with only public cert and key.
openssl x509 -in aps_development.cer -inform der -out appnameCert.pem
openssl pkcs12 -nocerts -out appnameKey.pem -in appnameKey.p12
cat appnameCert.pem appnameKey.pem > ck.pem
appnameKey.p12 is the private key used to generate the push notification certificate from your pc. You can export it using the Keychain Acceess.
Now you can send push notification. Before writing code let’s try to test it using openssl cmd line tool
openssl s_client -connect gateway.sandbox.push.apple.com:2195 -cert appnameCert.pem -key appnameKey.pem
If the Apple server replies and you can write some characters on the console means that you have created a valid certificate. We are ready to setup Sencha and the Push Server.
Configure Sencha Touch
In order to setup push notification you need to edit package.json with the following values. Be aware to use exactly the names reported on the Apple developer portal for your App. In this example I’m using the ones reported in the following screenshot
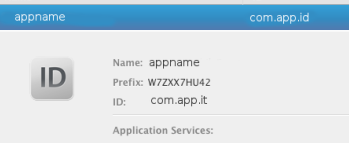
Please pay attention at applicationName, applicationId and bundleSeedId.
"applicationName": "appname",
"applicationId": "com.app.it",
"bundleSeedId": "W7ZXX7HU42",
"certificateAlias": "iPhone Developer",
"platform": "iOS",
"configuration": "Debug",
"certificatePassword": "your_pwd",
"provisionProfile": "your_provisioning_file.mobileprovision",
I’ve omitted all other configurations that remains the default one.
In order to enable push notification you have to manual entitle your app. Follow the entitlement file (please note the application identifier = SeedId + applicationId. In the example: W7ZXX7HU42.com.app.it).
<?xml version="1.0" encoding="UTF-8"?>
<!DOCTYPE plist PUBLIC "-//Apple//DTD PLIST EN" "http://www.apple.com/DTDs/PropertyList-1.0.dtd">
<plist version="1.0">
    <dict>
        <key>application-identifier</key>
        <string>W7ZXX7HU42.com.app.it</string>
        <key>aps-environment</key>
        <string>development</string>
        <key>get-task-allow</key>
        <true/>
        <key>keychain-access-groups</key>
        <array>
            <string>W7ZXX7HU42.*</string>
        </array>
    </dict>
</plist>
NOTE: When the app go in production change aps-enviroment to production
 <key>aps-environment</key>
 <string>production</string>
Now build you Sencha App and apply the entitlement
export PATH=~/bin/Sencha/Cmd/3.1.2.342:~/bin/Sencha/Cmd/3.1.2.342:~/bin/Sencha/Cmd/3.0.2.288:/Applications/Xcode.app/Contents/Developer/usr/bin/:/opt/local/sbin:/opt/ubersvn/bin:/Library/Frameworks/Python.framework/Versions/2.7/bin:/usr/bin:/bin:/usr/sbin:/sbin:/usr/local/bin:/opt/X11/bin:/usr/local/deployd/bin:/usr/local/git/bin
sencha app build native

codesign -f -dvvv -s "iPhone Developer" --entitlements entitl.plist build/appname/native/appname.app
The appname.app can be copied on your device and you are ready to receive push notifications.
Push notification server
The are several ways to send push notifications to your app. The are several cloud services, like parse.com; open source services such deployd.com; open source libraries in nodejs, c#, php, java…
A simple solution is to try SimplePush, a PHP class that send notifications to apple server.
The code uses ck.pem certificate. Just change the $deviceToken and the $passphrase. Save it on a file push.php and execute it: php push.php. A notification will be shown on your iPhone.
<?php
// Put your device token here (without spaces):
$deviceToken = 'b9a12ac7b782a1fe74cca9db1a2c511399cd9966f8f590d38975af6756112427';
// Put your private key's passphrase here:
$passphrase = 'your_pwd';
// Put your alert message here:
$message ='Grande giove!';
////////////////////////////////////////////////////////////////////////////////
$ctx = stream_context_create();
stream_context_set_option($ctx, 'ssl', 'local_cert', 'ck.pem');
stream_context_set_option($ctx, 'ssl', 'passphrase', $passphrase);
// Open a connection to the APNS server
$fp = stream_socket_client(
    'ssl://gateway.sandbox.push.apple.com:2195', $err,
    $errstr, 60, STREAM_CLIENT_CONNECT|STREAM_CLIENT_PERSISTENT, $ctx);
if (!$fp)
    exit("Failed to connect: $err $errstr" . PHP_EOL);
echo 'Connected to APNS' . PHP_EOL;
// Create the payload body
$body['aps'] = array(
    'alert' => $message,
    'sound' => 'default'
    );
// Encode the payload as JSON
$payload = json_encode($body);
// Build the binary notification
$msg = chr(0) . pack('n', 32) . pack('H*', $deviceToken) . pack('n', strlen($payload)) . $payload;
// Send it to the server
$result = fwrite($fp, $msg, strlen($msg));
if (!$result)
    echo 'Message not delivered' . PHP_EOL;
else
    echo 'Message successfully delivered' . PHP_EOL;
// Close the connection to the server
fclose($fp);
When Sencha registers the Push notification on your device it give you back the device token. You can send it to your server and use it for notification. If you have problems you can double check the device token with a simple IOS app that log on console the device token.
#import "itAppDelegate.h"
@implementation itAppDelegate

- (void)dealloc
{
    [_window release];
    [super dealloc];
}

- (BOOL)application:(UIApplication *)application didFinishLaunchingWithOptions:(NSDictionary *)launchOptions
{
    // Let the device know we want to receive push notifications
	[[UIApplication sharedApplication] registerForRemoteNotificationTypes:
     (UIRemoteNotificationTypeBadge | UIRemoteNotificationTypeSound | UIRemoteNotificationTypeAlert)];

    return YES;
}

- (void)applicationWillResignActive:(UIApplication *)application
{
    // Sent when the application is about to move from active to inactive state. This can occur for certain types of temporary interruptions (such as an incoming phone call or SMS message) or when the user quits the application and it begins the transition to the background state.
    // Use this method to pause ongoing tasks, disable timers, and throttle down OpenGL ES frame rates. Games should use this method to pause the game.
}

- (void)applicationDidEnterBackground:(UIApplication *)application
{
    // Use this method to release shared resources, save user data, invalidate timers, and store enough application state information to restore your application to its current state in case it is terminated later.
    // If your application supports background execution, this method is called instead of applicationWillTerminate: when the user quits.
}

- (void)applicationWillEnterForeground:(UIApplication *)application
{
    // Called as part of the transition from the background to the inactive state; here you can undo many of the changes made on entering the background.
}

- (void)applicationDidBecomeActive:(UIApplication *)application
{
    // Restart any tasks that were paused (or not yet started) while the application was inactive. If the application was previously in the background, optionally refresh the user interface.
}

- (void)applicationWillTerminate:(UIApplication *)application
{
    // Called when the application is about to terminate. Save data if appropriate. See also applicationDidEnterBackground:.
}

- (void)application:(UIApplication*)application didRegisterForRemoteNotificationsWithDeviceToken:(NSData*)deviceToken
{
	NSLog(@"My token is: %@", deviceToken);
}

- (void)application:(UIApplication*)application didFailToRegisterForRemoteNotificationsWithError:(NSError*)error
{
	NSLog(@"Failed to get token, error: %@", error);
}

@end
PushSharp
PushSharp is a well known C# library to send push notification to IOS, Android and other devices.
In order to send a notification with PushSharp you need (again 🙂 ) to convert your certificate in .p12
openssl x509 -in aps_development.cer -inform DER -out apn_developer_identity.pem -outform PEM
openssl pkcs12 -export -in apn_developer_identity.pem -inkey appnameKey.pem -certfile appname.certSigningRequest -name "apn_developer_identity" -out ck.p12
Now you can send notifications!
var push = new PushBroker();
String path = Path.Combine(AppDomain.CurrentDomain.BaseDirectory,".\\Resources\\certificate\\ios_cert\\ck.p12");
//Registering the Apple Service and sending an iOS Notification
var appleCert = System.IO.File.ReadAllBytes(path);
push.RegisterAppleService(new ApplePushChannelSettings(false, appleCert, "your_pwd"));
//Send a notification
push.QueueNotification(new AppleNotification()                                        .ForDeviceToken("b9a12ac7b782a1fe74cca9db1a2c559399cd9966f8f590118975af6756112427")
.WithAlert("Grande giove!")
.WithBadge(7)
.WithSound("sound.caf"));


Hello there,
I couldn’t manage to run second openssl command under PushSharp title.
it says “unable to load certificates”.
if i am run that command with little different it works:
openssl pkcs12 -export -in apn_developer_identity.pem -out aps_developer_identity.p12 -inkey appnameKey.pem
I couldnt send notification to device even pushsharp sent event fired.
What i am doing wrong?
Thnks in advance.
Hi, usually if you are able to send notification and the device don’t receive anything means that the certificate used to build the app is wrong. Try to redo all the steps. During my test I took a while before I was able to send notifications. A wrong letter in some ID and your certificate doesn’t work…
Remember to use -certfile appname.certSigningRequest in openssl pkcs12 -export for PushSharp. The appname.certSigningRequest is the certificate used to initialize the Apple certificate. You can generate it using Keychain->Keychain Access->Certificate Assistant->Request a Certificate from a Certificate Authority
When clicking in Identifiers -> App IDs -> , i got this error:
“An unspecified error ocurred. Please refresh and try agaian”
This only works on Mac OSX, right? Im doing this on Ubuntu…
Try to use safari
May be you have a javascript error
With Sencha touch 2.3 and cmd 4 you can use cordova and all it’s more easy because you can open your App with xcode and enable push notifications like a native application. Remember to register via JavaScript the device!
Hi giulioroggero,
Can you please send me a working sample code for cordova + Sencha Touch Push Notification on iOS…?
Following command raises “No certificate matches private key” error.
openssl pkcs12 -export -in apn_developer_identity.pem -inkey appnameKey.pem -certfile appname.certSigningRequest -name “apn_developer_identity” -out ck.p12
I am confused about which certSigningRequest to use. Should it be the certSigningRequest used when creating the push notification certificate or whatever?